કસાવા ઈન કોકોનટ મિલ્ક

આ રેસિપી લખનારનું નામ છે સંગીતાબેન વ્યાસ અને તેમણે તેમની કોઈ લોકલ ફ્રેન્ડ પાસેથી શીખી છે અને તેઓ કહે છે

કેકસાવા ને સ્વાહિલી ભાષા માં મુહોગો કહેવાય છે.. ઇસ્ટ આફ્રિકા ના લોકો એને તેમના મીલ માં ઉપયોગ કરે છે..

કસાવા જમીન ની અંદર થાય છે. અહી એની ખેતી કરીને લોકો પોતાનો જીવન નિર્વાહ ચલાવે છે.

આજની આ રેસીપી મેં આફ્રિકન રીતે બનાવી છે કોઈ પણ પ્રકારના મસાલા વગર અને તો પણ એકદમ ટેસ્ટી બની છે.

આપણે જો ટિપિકલ આપણી રીતે બનાવવા માંગતા હોય તો મસાલા નાખી ટેસ્ટ પ્રમાણે બનાવી શકાય..

વળી,કસાવા ને બદલે કાચા કેળા,શક્કરિયા કે બટેટા પણ આવી રીતે બનાવી શકાય છે .

ફરાળ માં બનાવવું હોય તો મેંદા ના બદલે તપકિર નો લોટ યુઝ કરવો અને ડુંગળી લસણ ઓમિટ કરવા..

INGRIDIENTS(ઘટકો)

૪ સ્ટેમ્સ,અને વજન માં ૧ કિલો કસાવા

૨ નાળિયેર

૧ ટેબલસ્પૂન મેંદો

મીઠું સ્વાદ અનુસાર

૧ નંગ ડુંગળી

૪ લીલા મરચા

૧ કળી લસણ

૩-૪ ટેબલસ્પૂન ફ્રેશ કોથમીર

૧ ટેબલસ્પૂન તેલ

જરૂર મુજબ પાણી

NUTRIENTS YOU GET (તમે મેળવો ન્યુટ્રિઅન્ટ્સ)

કસાવા એ એનર્જી નો સ્તોત્ર છે તેમજ પ્રોટીન, કૅલ્શિયમ અને ફાઇબર થી ભરપુર છે

કોકોનટ મિલ્ક જરૂરી વિટામિન અને nutrient પ્રોવાઈડ કરે છે,સાથે સાથે વિટામિન સી અને આયર્ન થી પણ ભરપૂર છે..

STEP 1

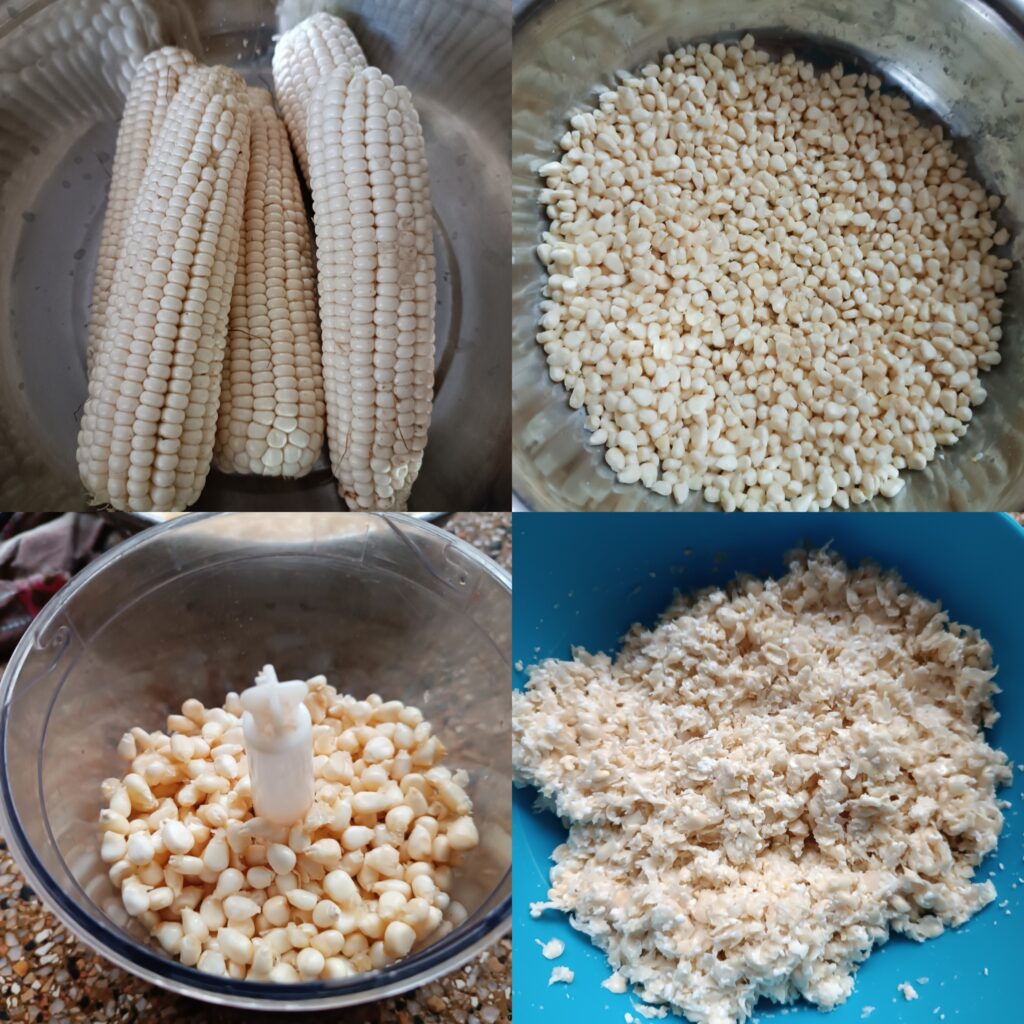
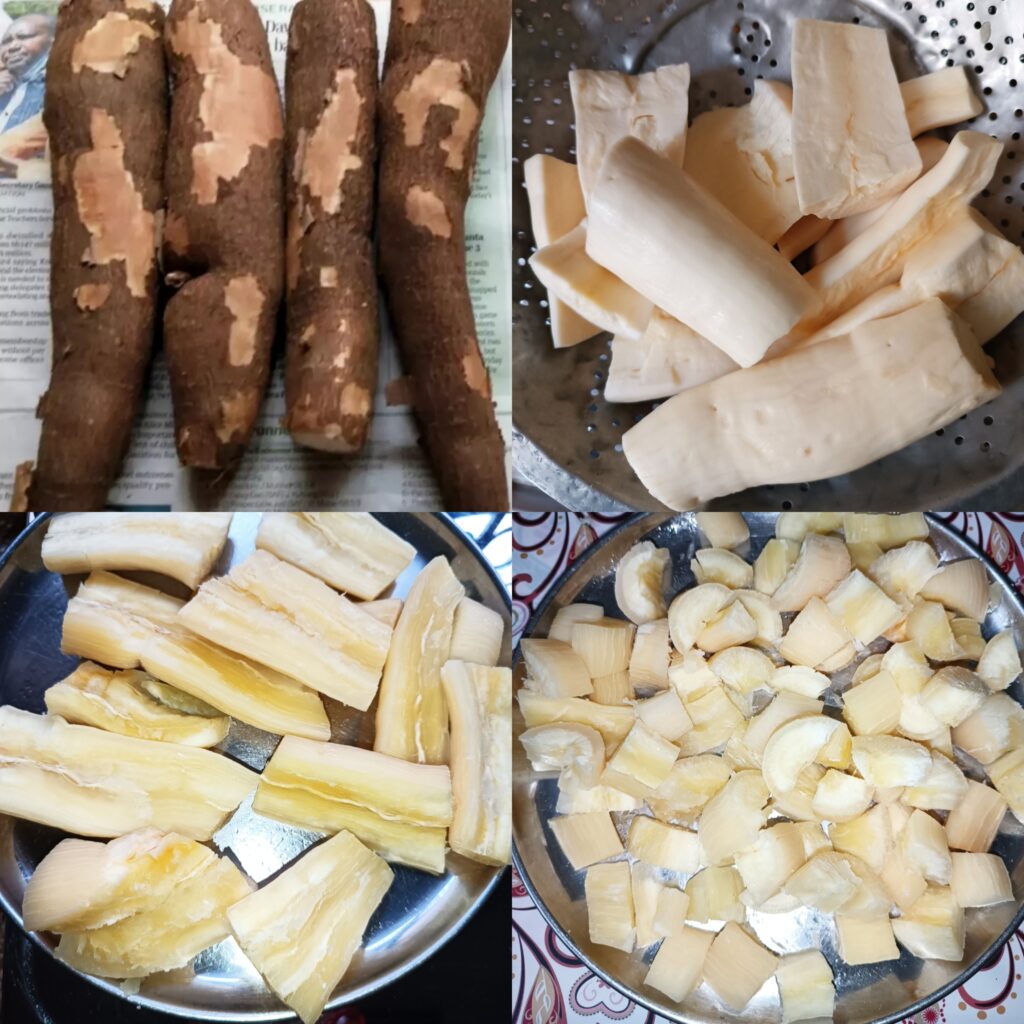
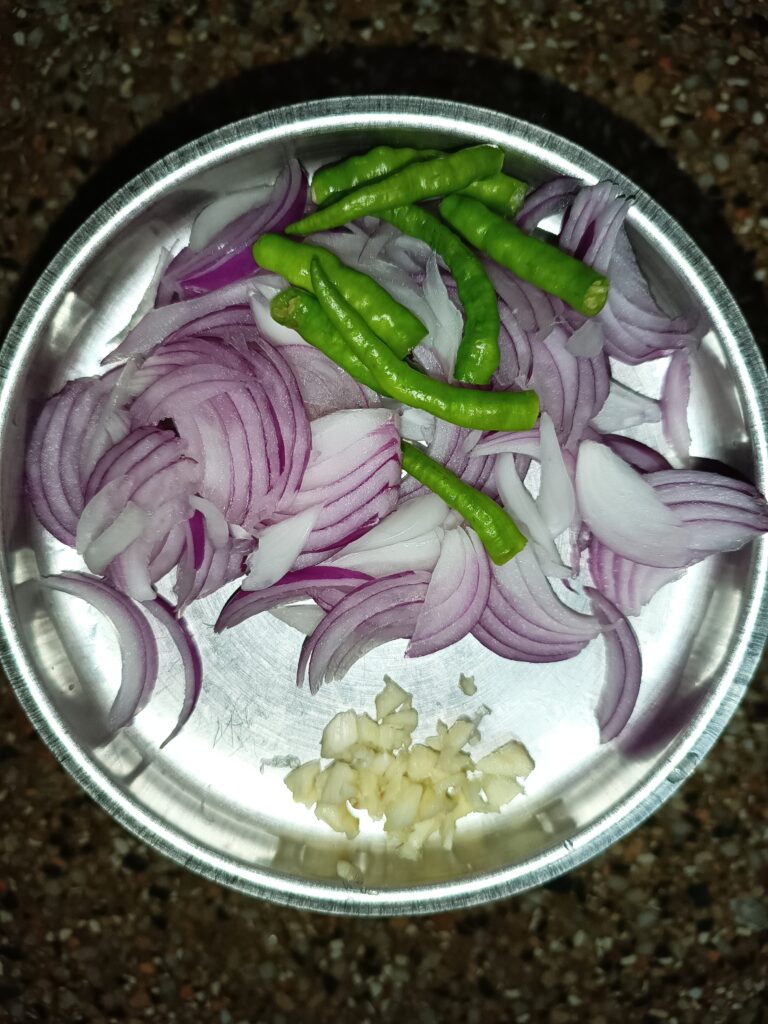
કસાવા ને ઉપર ની જાડી સ્કિન કાપી લેવી અને ધોઈ ને તેના બે કટકા કરી વરાળ થી બાફી લેવા.. ડુંગળી અને મરચા ના જુલિયન કટ કરવા અને લસણ ને ક્રશ કરી બધું તૈયાર રાખવું..

PICTURE OF STEP 1

STEP 2

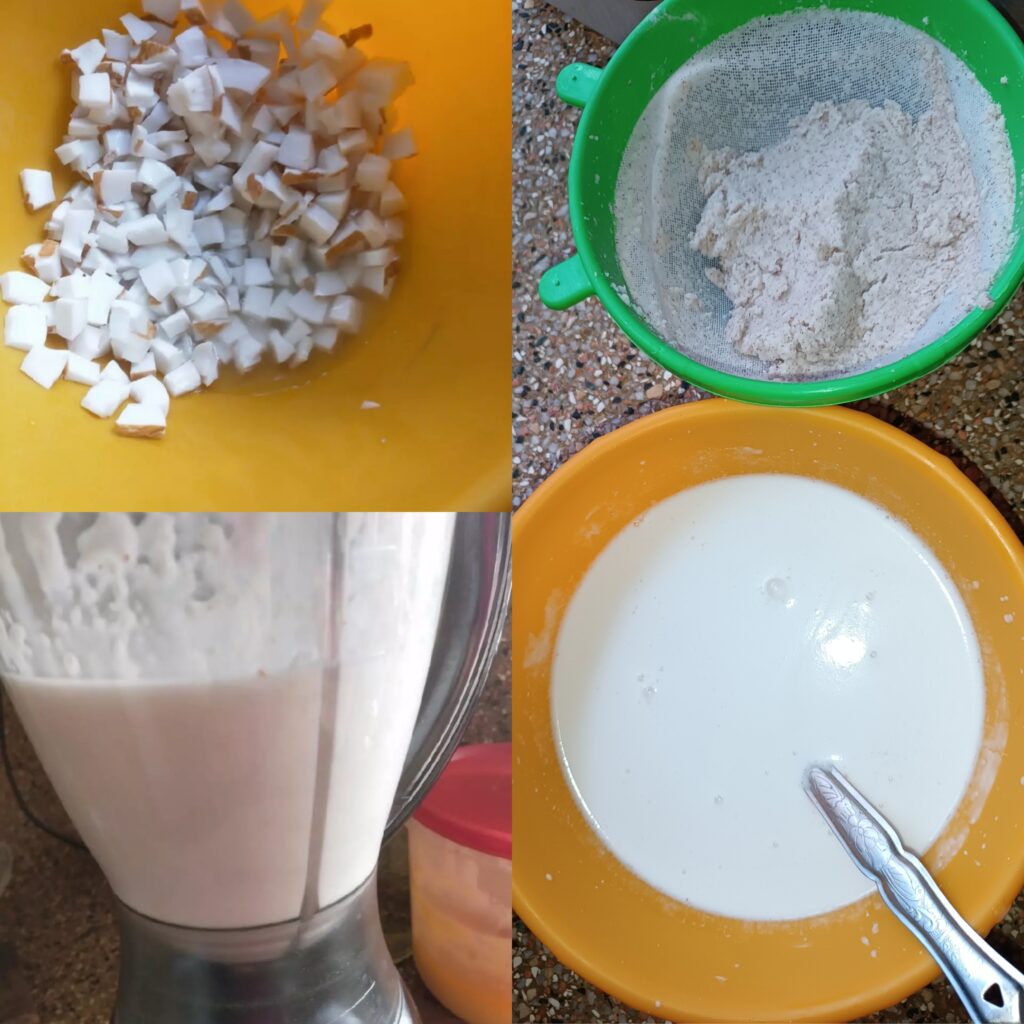
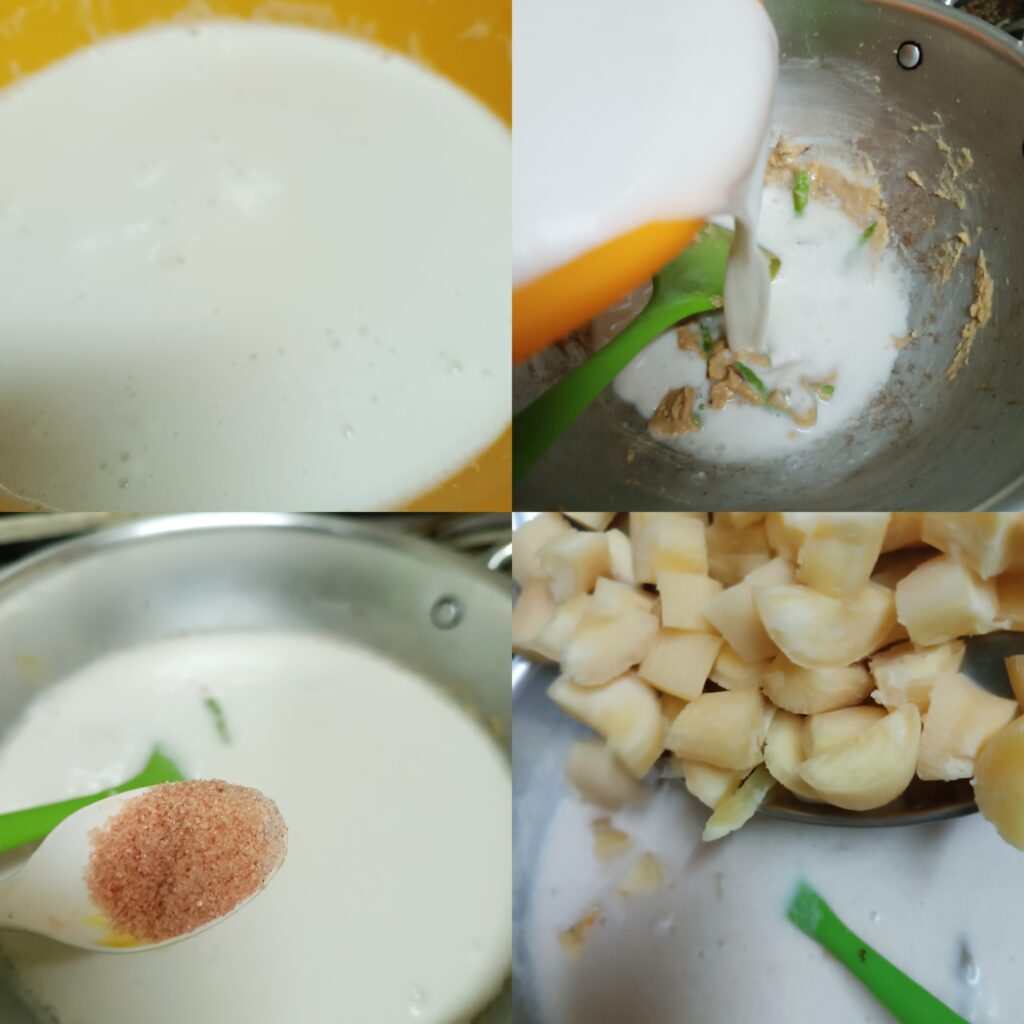
નાળીયેર નો સફેદ ભાગ કાઢી લઈ નાના ટુકડા કરી mixi જાર માં પાણી સાથે ક્રશ કરી ગરણી અથવા મલમલ ના કપડા ની મદદ થી squeeze કરી બધું દૂધ નિતારી લેવું. આ પ્રોસેસ બે વાર કરવો જેથી કુચા માં કાઈ કસ બાકી ન રહે.. આ દૂધ ટોટલ ૧ લિટર થાય એ પ્રમાણે પાણી એડ કરી ક્રશ કરવું..

PICTURE OF STEP 2

STEP 3

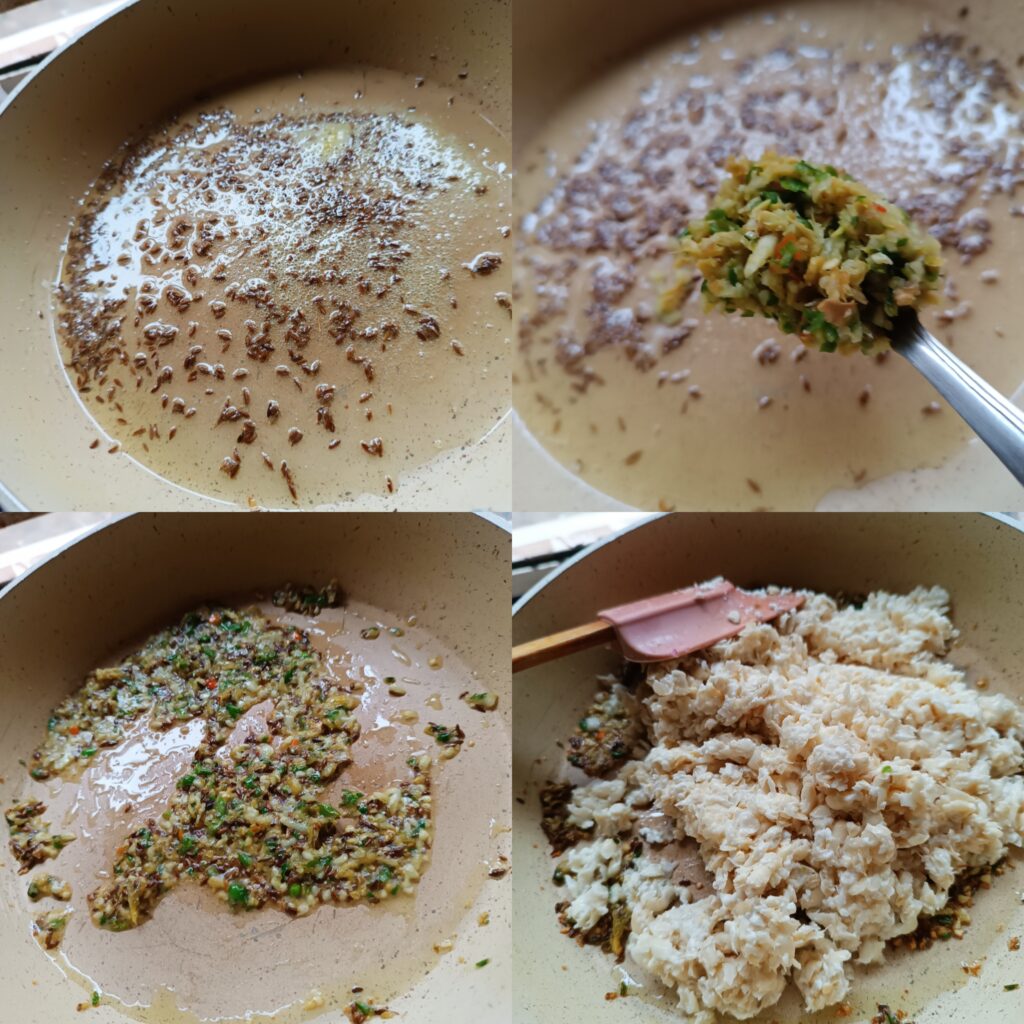
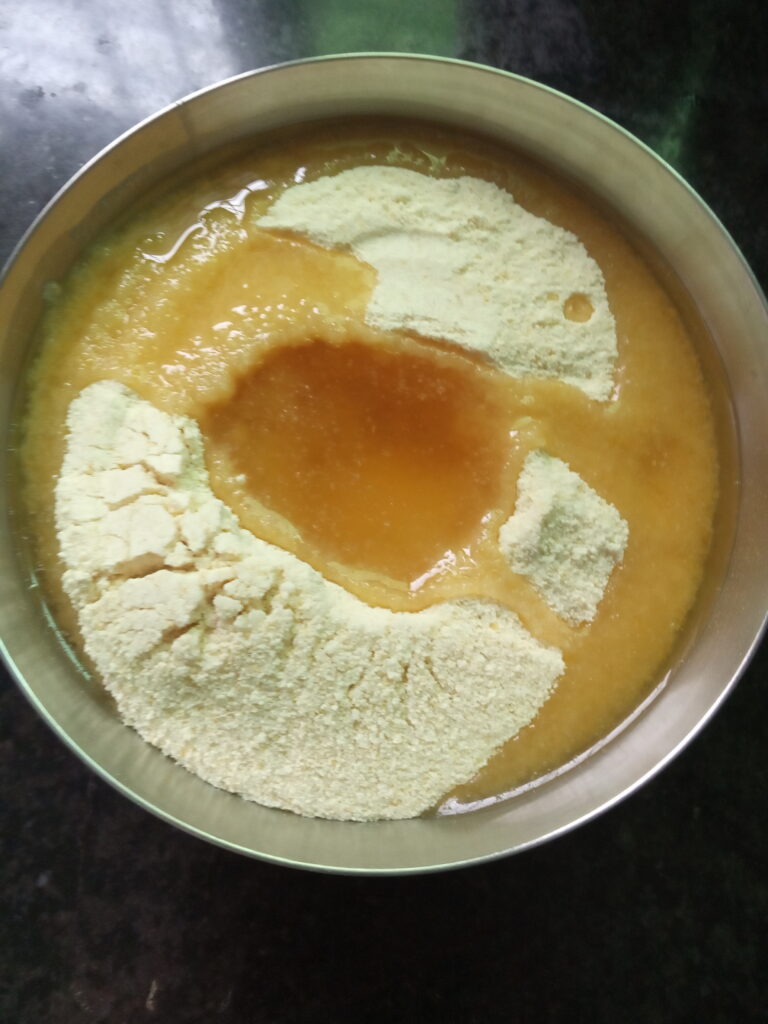
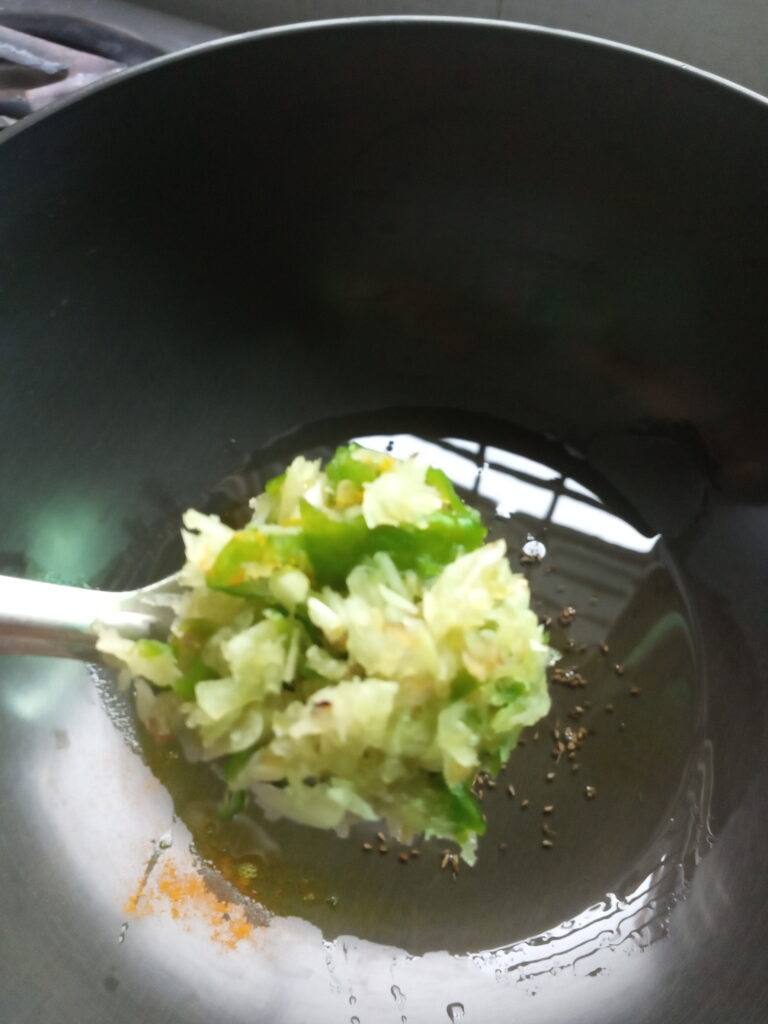
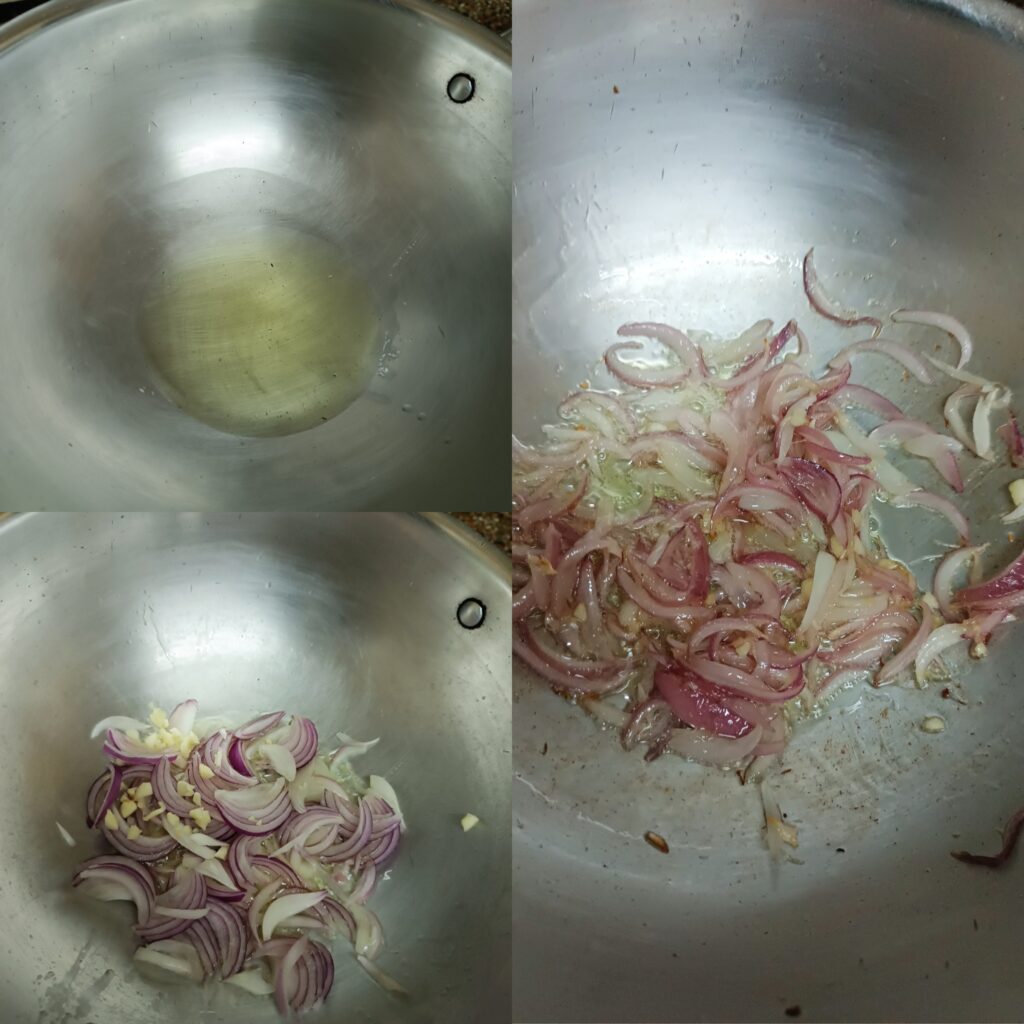
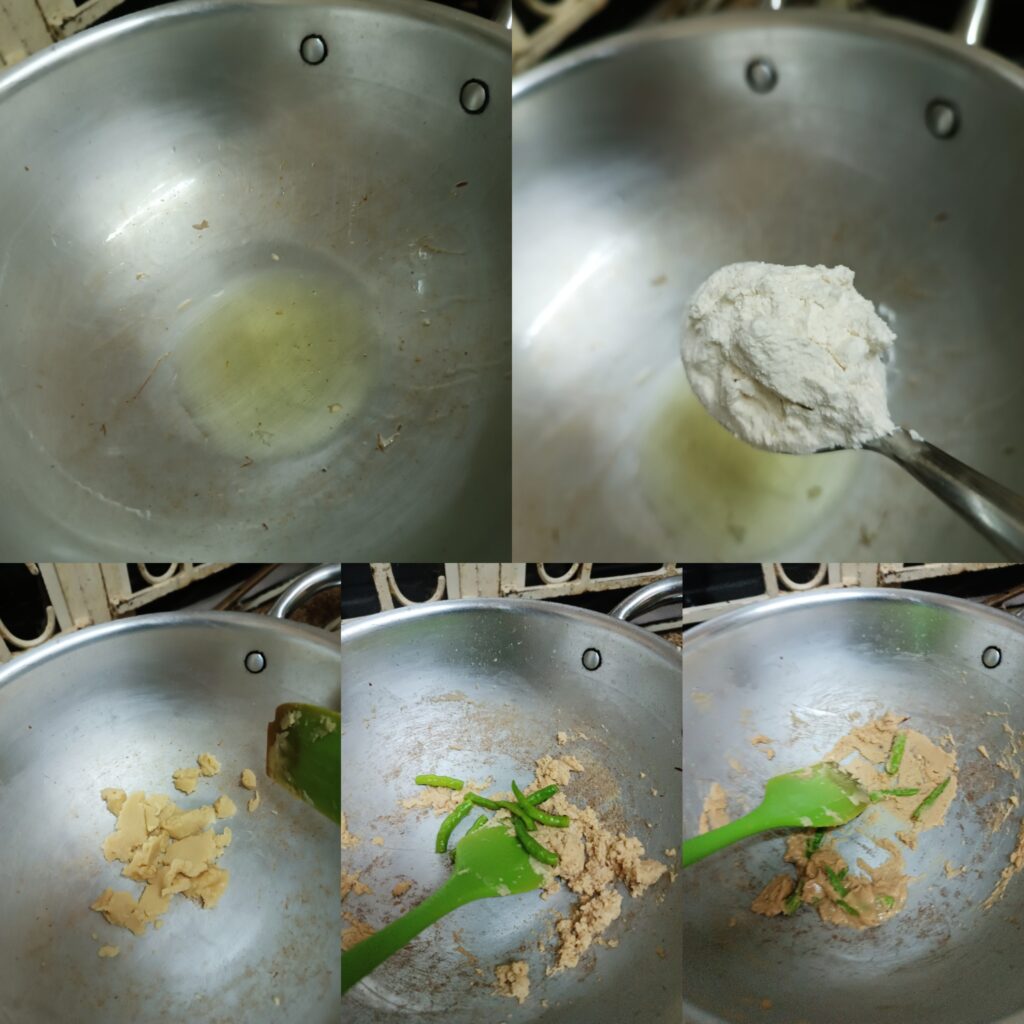
હવે પેન માં તેલ લઇ ડુંગળી અને લસણ ને આખા પાખા સાંતળી લેવા.અને ડીશ માં કાઢી લેવા.. હવે એ જ વધેલા તેલ માં મેંદો નાખી શેકી લેવો. શેકાઈ જાય ઍટલે તેમાં મરચા ના કટકા નાખી લોટ સાથે ૨ મિનિટ શેકવા જેથી લોટ ની ગરમાહટ થી મરચા પોચા પણ થશે અને લોટ માં તીખાશ આવી જશે.જેથી ફાઈનલ ડીશ ખાતી વખતે ગ્રેવી મોળી ન લાગે..

PICTURE OF STEP 3

STEP 4

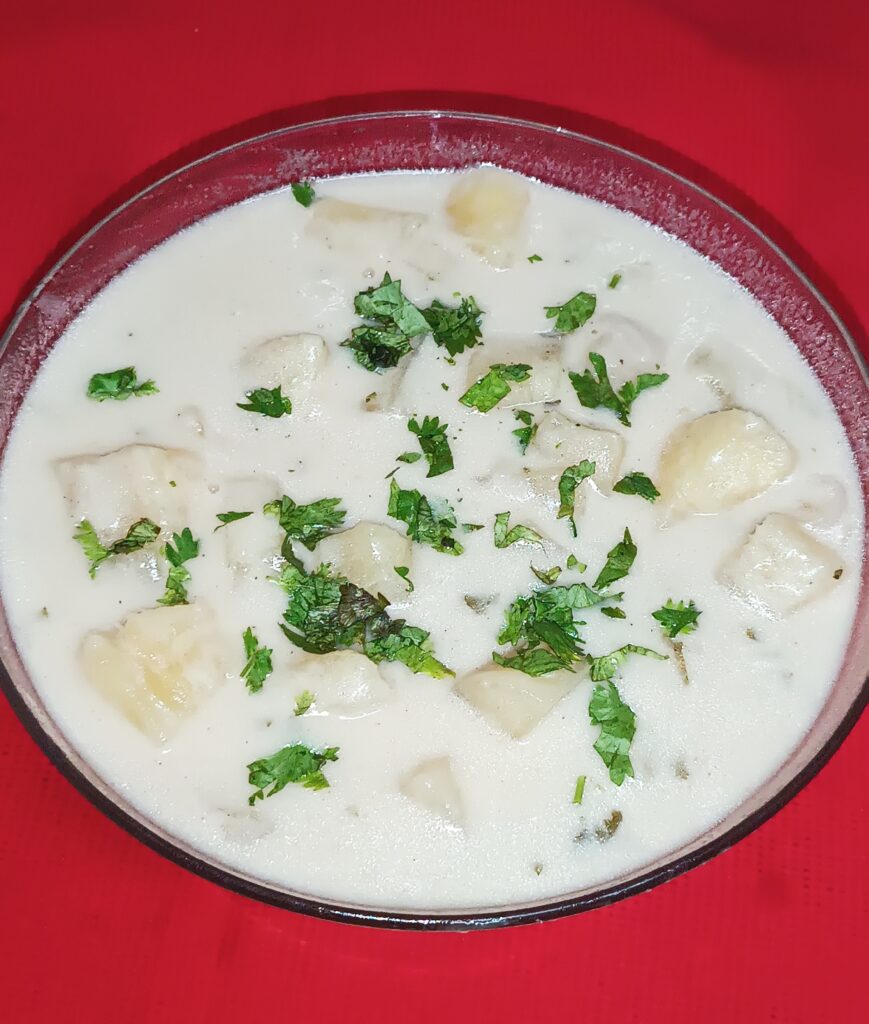
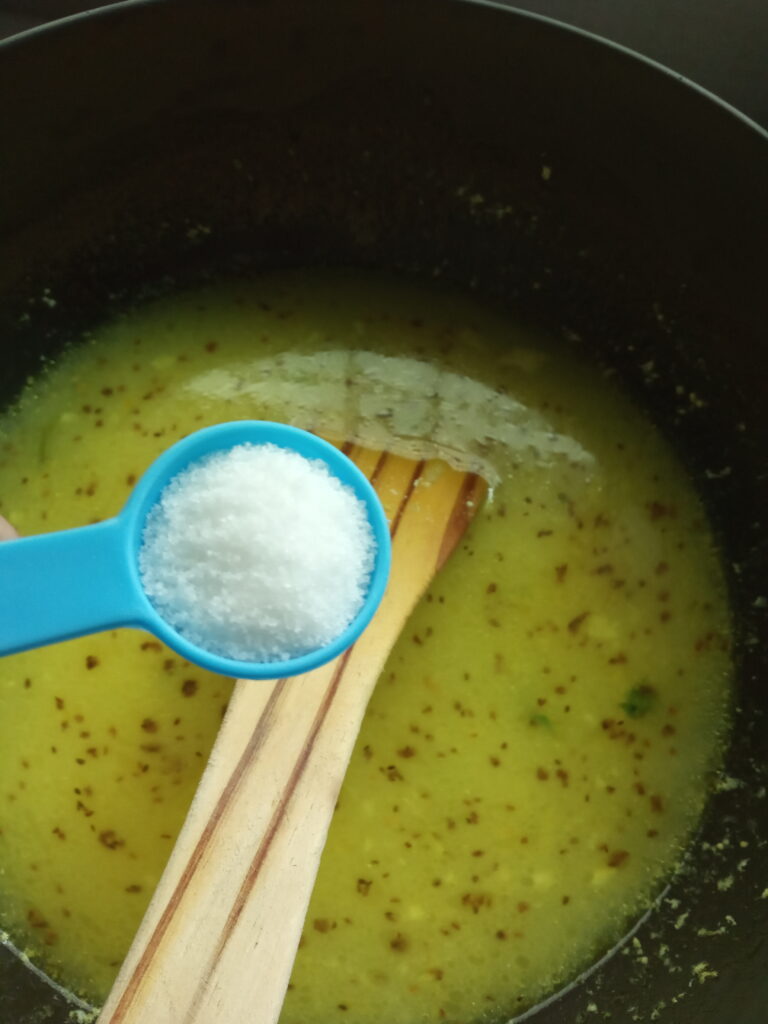
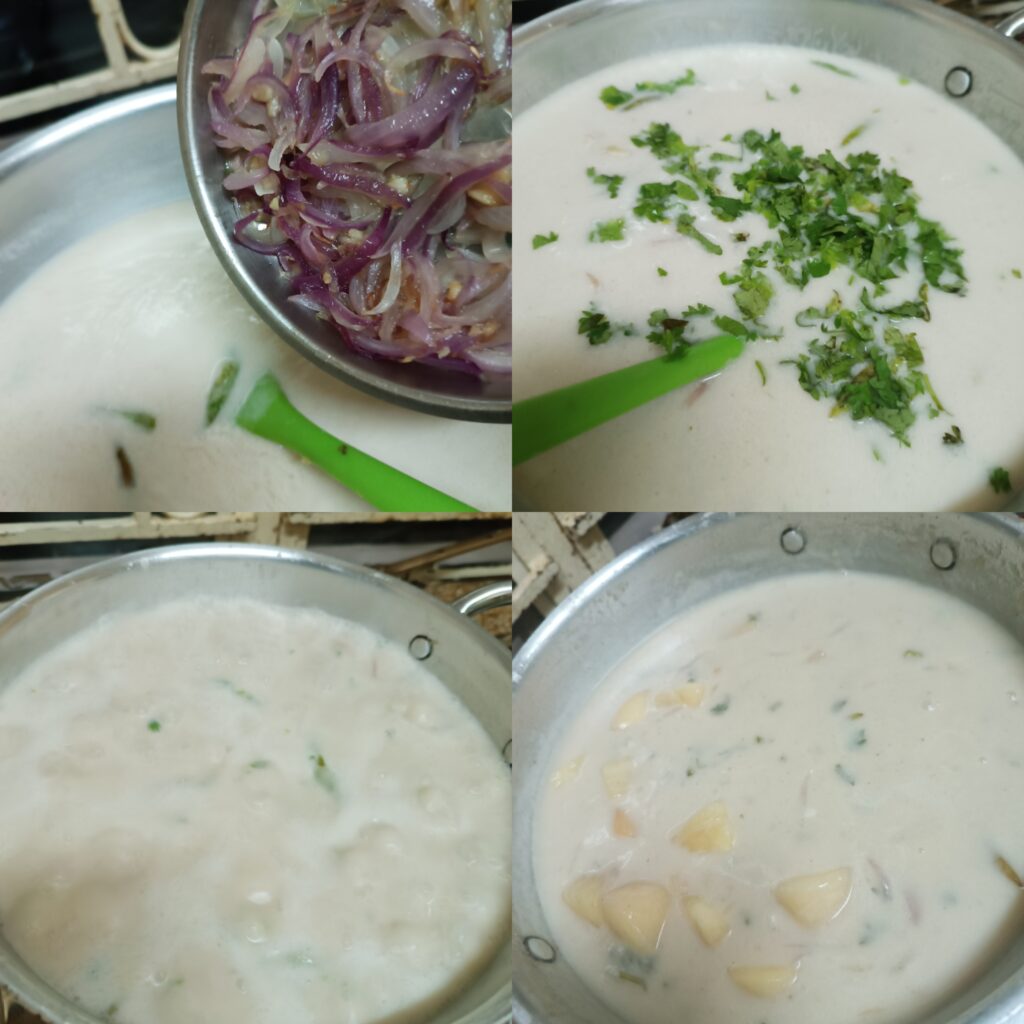
હવે લોટ અને મરચા શેકાઈ ગયા બાદ કોકોનટ મિલ્ક એડ કરવુ,સાથે મીઠું પણ ઉમેરી દેવું,ગેસ ધીમો રાખવો અને દૂધ ને હલાવ્યા કરવું જેથી cuddles ના પડે. દૂધ ઊકળવા નું શરૂ થાય એટલે તેમાં સાંતળેલા ડુંગળી લસણ, કટ કરેલા કસાવા ના કટકા અને કોથમીર નાખી પાછું હલાવતા રહેવું અને ઉકાળતું રહેવું.. હવે લાગે કે mixture થીક થવા આવ્યું છે એટલે જરૂરિયાત મુજબ ની ગ્રેવી જોઈતી હોય એ પ્રમાણે રાખી ગેસ બંધ કરી દેવો..

PICTURE OF STEP 4

STEP 5

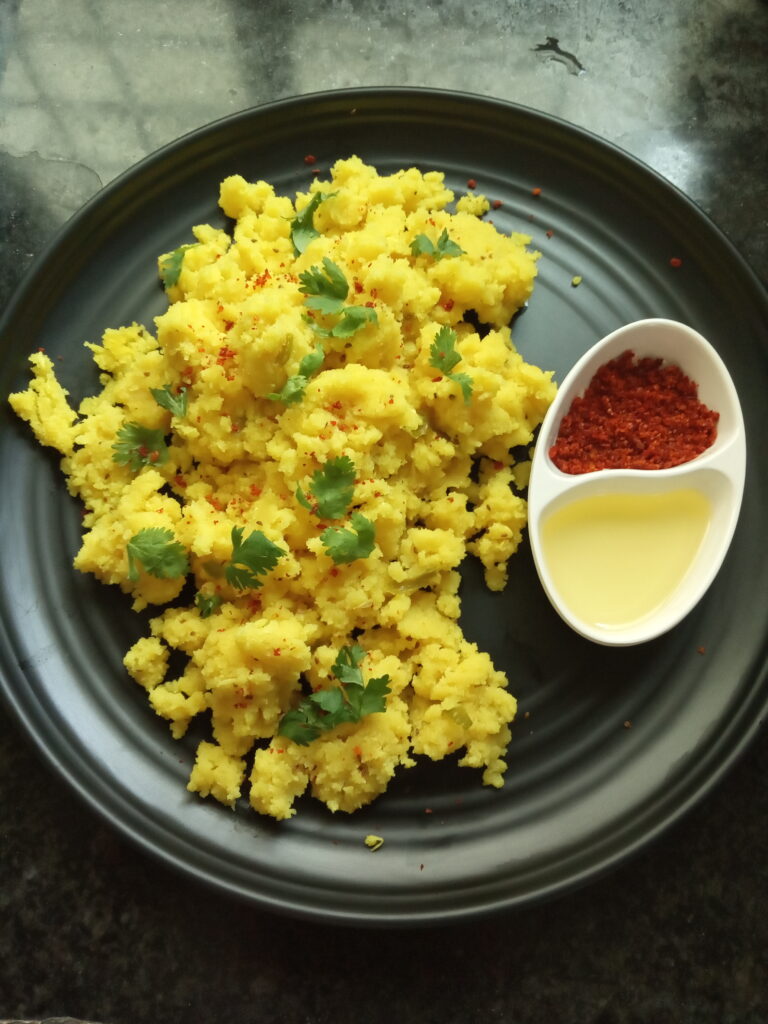
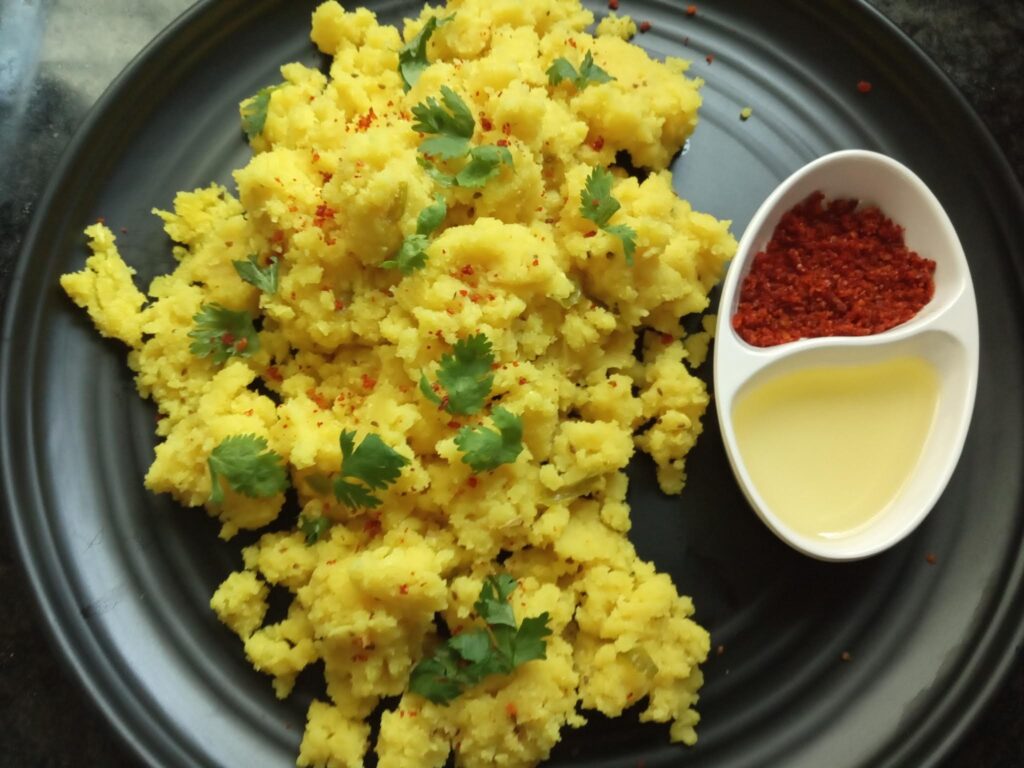
તો,તૈયાર છે Very delicious and Yummy … Cassava in coconut milk ..👌😋 સર્વિંગ બાઉલ માં કાઢી કોથમીર સ્પ્રિંકલ કરી સર્વ કરવું. આ એક One Pot Meal છે એટલે એકલું જ ખાઇ શકાય છે.. જો કસાવા મળે તો એકવાર જરૂર થી બનાવજો. અથવા આગળ કહ્યું તેમ કાચા કેળા,શક્કરિયા કે બટેટા ને પણ આવી રીતે બનાવશો તો દર વખતે બનાવવાનું મન થશે એવી મારી ખાતરી છે..👍🏻👍🏻

PICTURE OF STEP 5

મિક્સ લોટના વડા

મિક્સ લોટના વડા લગભગ દરેક ગુજરાતીને ભાવતા જ હોય છે પણ તેનું સાચું પ્રમાણ નથી મળતું હોવાથી તેમના વડા ફુલતા નથી અને ચવડ થઈ જાય છે તો આજે આ ગુજરાતી રેસીપી તમને સારી રીતે શીખવી હોય તો આ પોસ્ટ ચોક્કસ વાંચો

મિક્સ લોટના વડા ની રેસીપી લખી છે નૈમિષાબેન તેમની આ રેસીપી નૈમિષા બેન એ તેમના સાસુ પાસેથી શીખી છે. કોઈપણ વસ્તુ બગાડવાની નહીં અને તેનો ઉપયોગ સારી રીતે રસોઈમાં કેવી રીતે કરવો એ આવડત નૈમિષા બેન એ એમના સાસુ પાસેથી શીખી છે

વડા માટે જરૂરી સામગ્રી

દરેક માપ બાઉલ પ્રમાણે લેવો


મિક્સ વળા નો લોટ એક બાઉલ

પોણો બાઉલ બાજરીનો લોટ

એક બાઉલ પીળી મકાઈનો લોટ

એક બાઉલ ઘઉંનો લોટ

એક બાઉલ માં મગસ

20 થી 22 લસણની કડી

છ થી સાત લીલા મરચા

એક ઇંચ આદુનો ટુકડો

બે ચમચા તેલ

પોણી ચમચી હળદર

એક ચમચી લાલ મરચું

બે ચમચી મીઠું

બે ચમચી તલ

200 ગ્રામ છીણેલી દુધી

બે ચમચી દળેલી ખાંડ

બે ચમચા તેલ

ચારથી પાંચ ચમચી દહીં

જરૂર પ્રમાણે પાણી

તળવા માટે તેલ

મિક્સ લોટના વડા બનાવવાની રીત

સૌપ્રથમ એક મોટી કથરોટમાં બધા જ લોટ પ્રમાણસર અલગ અલગ લેવા હવે તે જ કથરોટમાં બરાબર લોટના પ્રમાણમાં જ મગસ લેવું

મરચા અને લસણ અને ક્રશ કરવા અને આદુને છીણવું

200 ગ્રામ જેટલી દૂધી પણ છીણીને તૈયાર રાખવી

હવે બધી જ સામગ્રી કથરોટમાં ભેગી કરી લેવી ચારથી પાંચ ચમચી દહીં પણ નાખવું

હવે બધી સામગ્રી ભેગી થઈ જાય એટલે થોડું થોડું પાણી છાંટી અને લોટ બાંધીને તૈયાર કરવો

હવે એ લોટમાંથી નાના નાના લુવા કરી અને પ્લાસ્ટિક ઉપરથી થેપી ને તૈયાર રાખવાપાણી વારો હાથ કરી અને વડુ ને થેપવું અને તેની ઉપર થોડા તલ ચોટાડવા જેનાથી તલ તળતી વખતે પણ તેલમાં પડી નહીં જાય

બીજી બાજુ કડાઈમાં તેલ મૂકી તેને સરખું ગરમ થવા દેવું અને વડુ નાખો ત્યારે ગેસ ફાસ્ટ રાખો

વડુ એક બાજુથી લાલ થઈ જાય ત્યાં સુધી તેને અડવું નહીં ત્યાર પછી ઝારાથી થોડું થોડું દબાવશો એટલે વડુ ફૂલી જશે ફૂલે એટલે બીજી બાજુ તેને ફેરવી દેવું

આ રીતે બધા જ વડા તમારા ફૂલીને તૈયાર થશે

સફેદ મકાઈ ના સ્ટફ પરાઠા

યેલો મકાઈ બધા ની ફેવરિટ હોય છે અને એની ઘણી recipe બનાવીએ છીએ..એટલું જ સફેદ મકાઈ ને લગભગ avoid કરીએ છીએ..તો મને થયું કે આજે તો કઈક બનાવી ને બતાવી દઉં..એવો વેરો આંતરો કેમ?..એટલે સરસ ચડિયાતા મસાલા કરી ને સફેદ મકાઇને પરાઠા ના રૂપ માં શણગારી જ દીધી.. અને સાચે જ બહુ જ યમ્મી recipe તૈયાર થઇ ગઇ..👌😋

આ રેસિપી લખનાર નું નામ છે સંગીતા વ્યાસ સંગીતાબેન એ આપણને ઘણી બધી રેસીપી આગળ પણ આપી છે એ સિવાય પણ સંગીતાબેન પાસે ઘણું બધું જ્ઞાન છે ધર્મ વિશે પણ તમે એમને કંઈ પૂછો તો તેમની પાસે સાચો જવાબ હોય છે સાચી માહિતી હોય છે. આ વાનગી એમની પોતાની જ રીતે બનાવેલી છે ક્યાંય થી એમણે શીખી નથી કે કોઈએ તેમને શીખવાડી નથી

(તમે મેળવો ન્યુટ્રિઅન્ટ્સ)

સફેદ મકાઈ લો સોડિયમ અને મેંગનેશિયમ,કેલ્શિયમ થી ભરપુર છે.આ મકાઈ માં થી વિટામિન A અને પુષ્કળ પ્રમાણ માં આયર્ન મળી રહે છે..

સફેદ મકાઈ ના સ્ટફ પરાઠા બનાવવા માટે ની સામગ્રી

પરાઠા ના લોટ માટે..

૧ બાઉલ ઘઉં નો લોટ

તેલ ૧ ટેબલસ્પૂન

૧ ચમચી મીઠુ

અજમો ૧ ચમચી

૧ ચમચી ચીલી ફ્લેક્સ

૧ ટેબલસ્પૂન ફ્રેશ કાપેલા ધાણા

જરુર મૂજબ પાણી,લોટ બાંધવા

સ્ટફિંગ માટે..

૫ નંગ સફેદ મકાઈ નો ક્રશ કરેલો માવો

મીઠું સ્વાદ અનુસાર

૧ ચમચી મરચું પાવડર

૧ ચમચી ધાણાજીરૂ

૧/૨ ચમચી હળદર

૩ ટેબલસ્પૂન ફ્રેશ ધાણા

૧ ચમચી ખાંડ

આમચૂર પાવડર ૧ ચમચી

૧ નંગ બાફેલા બટેટા નો માવ

તડકા માટે

.. ૧ ટેબલસ્પૂન તેલ

૧ ચમચી જીરૂ

૧/૪ ચમચી હિંગ

૨ ટેબલસ્પૂન ક્રશ આદુ મરચા લસણ

સર્વિંગ માટે

એક કટોરી દહી

૨ ચપટી મરચું પાવડર સ્પ્રિંકલ કરવા

પરાઠા શેકવા માટે જરૂર મુજબ તેલ

સફેદ મકાઈ ના સ્ટફ પરાઠા બનાવવા માટે ની રીત

પરાઠા બનાવાની રીત

STEP 1

સૌથી પહેલાં લોટ બાંધી લઈશું. Bowl માં ઘઉં નો લોટ લઈ, મોણ મીઠું, અજમો ફ્રેશ ધાણા અને ચિલી ફ્લેક્સ નાખી સારી રીતે મોઈ લેવો, ત્યારબાદ જરૂર મુજબ પાણી એડ કરી રોટલી થી થોડો કઠણ એવો લોટ બાંધી ઢાંકી ને ૧૦ મિનિટ rest આપવો..

PICTURE OF STEP 1

STEP 2

હવે મકાઈ તરફ જઈએ.. મકાઈ ના પાન અને રેસા કાઢી સાફ કર્યા બાદ દાણા છૂટા પાડી લીધા અને તેને ચોપર માં આખા પાખા ક્રશ કરી લીધા..

PICTURE OF STEP 2

STEP 3

હવે, નોનસ્ટિક પેનમાં તેલ લઈ જીરું અને હીંગ નો વઘાર કરી ક્રશ આદુ મરચા લસણ ને સારી રીતે સાંતળ્યા.ત્યારબાદ તેમાં ક્રશ કરેલો સફેદ મકાઈ નો માવો એડ કરી મિક્સ કર્યું..

PICTURE OF STEP 3

STEP 4

હવે મિક્સ કરેલા મકાઈ માં,મીઠું મરચું હળદર ધાણાજીરું ફ્રેશ ધાણા ખાંડ અને આમચૂર પાવડર નાખી મિક્સ કર્યું.પછી તેમાં બાફેલા બટેટા નો માવો નાખી મિક્સ કરી ધીમા તાપે ચડવા દીધો,પછી તેને એક ડીશ માં કાઢી ઠંડો કરવા મૂક્યો..

PICTURE OF STEP 4

પરાઠા બનાવાની રીત

STEP 5

પૂરણ ઠંડું થઈ ગયા બાદ તેમાંથી મિડીયમ સાઇઝ ના બોલ્સ બનાવી લીધા અને બાંધેલા લોટ માંથી પણ એટલા જ quantity ના લુઆ તૈયાર કરી લીધા..

PICTURE OF STEP 5

STEP 6

ત્યારબાદ અટામણ લઇ આડણી પર પુરી જેવડું વણી તેના પર મકાઈ ના મિશ્રણ નો બોલ મૂકી ચારે બાજૂ થી બંધ કરી લૂઓ કરી,softly પરોઠું વણી લીધું..

PICTURES OF STEP 6

STEP 7

તવી ને તેલ થી ગ્રીસ કરી ગરમ કરી લઈશું અને વણેલું પરોઠું મૂકી સ્લો ફ્લેમ્ પર બંને બાજુ તેલ મૂકી ગુલાબી રંગ નું શેકી લેશું..આમ બધા પરાઠા બનાવી લેશું.. તો, તૈયાર છે સફેદ મકાઈ ના સ્ટફ પરાઠા.. મરચું પાવડર સ્પ્રિંકલ કરેલા દહી સાથે સર્વ કર્યા છે, અને સ્વાદ માં એકદમ યમ્મી બન્યા છે..👌 A Must try Recipe..👍🏻👍🏻

PICTURE OF STEP 7

try this recipe from the same author or homecook

https://supersaheliya.com/wp-admin/post.php?post=1740&action=edit

https://supersaheliya.com/wp-admin/post.php?post=2088&action=edit

તમારા સમય માટે તમારો ખૂબ ખૂબ આભાર અને આ રેસીપી વિશે તમે શું વિચારો છો તે અમને જણાવવા માટે નીચે એક ટિપ્પણી મૂકો કારણ કે તે અમારા લેખકોને પ્રોત્સાહિત કરશે. કૃપા કરીને બધા લેખકો દ્વારા આપવામાં આવેલી બધી વાનગીઓ અજમાવો અને તમારી ટિપ્પણી લખો.

જો તમે પણ ઈચ્છો છો કે સુપર સહેલીયા તમારી રેસિપી અમારી વેબસાઈટ પર અપલોડ કરે તો આ લિંક પર ક્લિક કરીને ફોર્મ ભરો.

https://docs.google.com/forms/d/e/1FAIpQLSdwwqGeXs_QiYuJ3yUHYMZN-QFgI8lDuIQrQ_xl2QMW2r2GiQ/viewform?usp=sf_lin

An African Dish Ugali and Mchicha

An African dish ugali and mchicha is a very famous dish.In African countries mostly east Africa,most population are poor,they can’t afford to eat non veg everyday. although they harvest maize, so can eat maize in all form. With maize they make leafy vegetables.like mchicha,sukuma wiki,spinach, cabbage etc . They are hard working and also do labour work ,so need extra strength,that’s why they prefere ugaali and any kind of leafy vegetables.. Here I m making one of their main dish,just go through my recipe and u will also love to make and eat it . With it they make salad, called “kachumbari”.

An african dish ugali and mchicha dish recipe is given to us by sangita vyas.sangita lives in kenya has learnt this recipe from her house help. also try this recipe written by same authorhttps://supersaheliya.com/dudhi-no-halvo/

saheli sangita vyas

INGRIDIENTS FOR AN AFRICAN DISH UGALI AND MCHICHA

For Ugali..

3 cups White Maize flour

6 cups water (always plus n minus) 1 tblspn

cumin seeds 3 tblspn

ghee 1 tblspn

alt ( They don’t add Cumin seeds,ghee and salt in their ugali, I add coz of better taste)

For Mchicha..

( vegetable) 3 bunch of Mchicha

2 no’s onion cuts in Julien

1 no tomato in small diced

3 pcs Garlic cloves cuts in Julien

1″ ginger cuts in small pcs

2 pcs green chillies cuts in slits

1 glass of water

Spices..

1 tsp Red chilli powder

1 tsp Turmeric Powder 1 tsp Cumin-Coriander Powder

Salt to taste ( They don’t add any spices except salt but I’ve added for good tastes)

Tempering..

2 tblspn oil

1 tsp mustered seeds

,cumin seeds

mix 1/2 tsp Asafoetida, turmeric powder

mix Salad..Kachumbari..

1 Carrot 1 Capsicum 1 Tomato 1 Onion 1 Cucumber

For chhash..

150 grams curd

2 glass Water

1 tsp Black paper powder

1 tsp Dry Mint powder

6-7 ice cubes

1 tsp salt

NUTRIENTS YOU GET FROMAN AFRICAN DISH UGALI AND MCHICHA

Benefits of green leafy.. Green leafy vegetables are nutrient-packed foods that may offer a variety of health benefits. Regularly consuming servings of greens can be beneficial for health and may help prevent some health conditions. Benefits of maize flour Maize flour has lower calories compared to wheat flour. It is high in proteins and starch. Maize is also rich in iron, phosphorous, zinc and various vitamins. Abundant in antioxidants, it is proven to be good for eyesight and also helps in the prevention of cancer, and anaemia.

STEPS TO MAKE UGALI AND MCHICHA

STEP 1

Wash n cut the leaves,again wash fr 2-3 times so that we are sure of there isn’t any kind of spray and particles of sand. Take a big pan Add oil and all tempering ingredients.let them crackled well, Add onion Julien,garlic,ginger and green chillies, sauté until Onion turn transparent. Add tomato cuts,sauté again till smashy form,, Add water and dry masala.. Let it boil..

PICTURE OF STEP 1

STEP 2

Now add leaves (bhaji) to the boiled masala water,cover the water with leaves, don’t stir.. Let it be like that and cover the pan, Put the flem medium for at least 5 minutes.. After the time the leaves will be soft n cook.mix it nicely. If there is no Water,add 1/2 glass of water, The Mchicha should be bit gravy so can eat with ugali..

PICTURE OF STEP 2

STEP 3

Final pic of Mchicha look alike this..👇

STEP 4

Now Ugali time.. Take a water in big pan. Add Cumin seeds,ghee and salt.. Let the water boil .

STEP 5

Slowly add maize flour in boiling water, Continues Stir with spatula till all flour merge with water and looks become soft dough.. Make sure the flour is well cooked coz we are not steaming again so Ugali should be completely cooked.

STEP 6

Final Ugali look alike this .👇

STEP 7

For salad and chhash .. Wash all the salad, Grate carrot, Dice the cucumber, capsicum and Tomato, Cut the onion in half ring. Mix well . Take curd in a jar whisk it, add Ice cubes,water, Black paper powder,dried Mint powder and salt.. Whisk it properly and put it in the fridge for chilled.. ( I’ve forgotten to click chhash pic) Final pic of the Recipe Called ugali, Mchicha,salad and chhash..

FULL DISH

Nutritious Ragi Roti

Nutritious Ragi Roti is really nutritious as the key ingredient is Ragi which is a very healthy grain. Many people prefer a healthy breakfast. This recipe can be a good option for kids’ tiffin box as it can keep full for long hours.Also try this africian recipe https://supersaheliya.com/an-african-dish-ugali-and-mchicha/

ragi roti with chutney

Rashmi Panchal writes nutritious ragi roti recipe. Rashmi says that everyone should use a variety of flours in roti to balance all the nutrients in the body. We also have a few more nutritious recipes from the author.

Saheli Rashmi Panchal

INGRIDIENTS

1. 200 gm nice ragi flour

2. 50 to 100 gm rice flour

3. 1tbs oil for tadaka

4. 1 tsp rai and jira

5. Some currypatta and 1/4 tsp thing

6. 250 ml water : or same proportion of flour

7. One big onion cut in small pieces

8 1 tsp Chilly ginger paste or as par taste

9. 1/2 cup greated coconut

10 1/2 cup dhaniya kothmir

# Ingredients for chutney #

1 Onion one small size

2. Tometo one small size

3. 1/4 cup coconut fresh or desiccated

4. 1/4 cup daliya (fried gram)

5. 2 to 3 dry Red chilli

6. 1 tsp imli juice or lemon juice

7 3 flak ( Kali)garlic and Salt as par taste

8. 1/4 cup Green Dhaniya washed and chopped ( I have added after grind so colour of chutney will not change)

NUTRIENTS YOU GET

Ragi is good source of iron and calcium , vitamin c and more fibre too

STEPS TO MAKE NUTRITIOUS RAGI ROTI

STEP 1

Take a pan and take oil , add rai and jira wait for crack add hing chilly ginger paste . Add chopped currypatta. Add onion sauté for some time and add water and salt .

STEP 2

Add flour mix in boiling water and thoroughly mix in boiling water like khichhu .keep lid on it and cook for some time . Cook till not stick on hand. Ster if required ( use Velan)

STEP 3

cook properly transfer it to big bowl so we can easily mix . Keep aside for cool the mixture . Now add coconut and dhaniya and mix it properly.

STEP 4

Now rolling time , take one big lemon size ball of aata and roll with little aata . May stick on bottom take little more aata and roll it like roti.

STEP 5

Now roast like paratha both the side apply oil or ghee . Roast both side till little brown.

STEP 6

It is so soft and little crunchy also. Now serve this nutritious and tasty roti with any kind of chutney.

STEP 7

In this chutney , in oil add rai , jira ,red chilli, currypatta, add garlic , onion , tomato , salt , imli paste sauté nicely now add coconut and fried gram , cook till tomato soften and realise oil . Cool down mixture and grind it nicely add little water. Now seasoned with one more tadaka with rai , hing and currypatta can add red chilli . Add green chopped dhaniya . So chutney’s. colour will not change otherwise it becomes brown colour, adjust consistency with water .

Green Garlic khichu( papdi no lot)

Green Garlic Khichu is a healthy and tasty Gujarati cuisine made with rice flour, it generally served as street food in Gujarat, especially in the winter season, you can eat it any time, very simple & easy to make it, but when you add green garlic & green coriander, you feel it very tasty, everyone likes it

Green Garlic Khichu

The recipe of Green Garlic Khichu recipe is made by saheli Pinal. She has learned this recipe from her elder sister. She says that Khichu in any form is her favorite recipe. It is always a heart-filling recipe for her rather than being a stomach-filling recipe.

INGRIDIENTS(ઘટકો)

  • 1 cup rice flour
  • 1 teaspoon salts ( as per test)
  • Pinch of asafoetida
  • 1/2 teaspoon cumin seeds (jeera)
  • 1/2 teaspoon carom seeds (Ajwain)
  • 1 teaspoon pickle masala
  • 1 teaspoon butter
  • 2 teaspoons peanut oil
  • 2 tb green coriander
  • 1/4 cup green garlic
  • 2.5 cup water
  • 2 teaspoon finely chopped green chilies

STEPS TO MAKE GREEN GARLIC KHICHU

STEP 1

First of all, take a deep kadhai, put it on a gas stove, pour 2.5 cups water, once the water is about to reach the boiling point

STEP 2

Now we will add crushed cumin seeds, carom seeds, salt, asafoetida, 2 teaspoon finely chopped green chilies, green coriander, little bit of oil, after 2minutes we will add rice flour & stir it continuously with a rolling pin.

STEP 3

Mix well, break lumps, Let’s Cover & cook it on a medium flame for five minutes, water absorbs, smooth & fluffy texture, it’s ready to serve now fill up the plate with rice khichu , spread, butter & peanut oil, sprinkle pickle masala, garnish it with green garlic & coriander .. enjoy the Tasty khichu

Thank you so much for your time and do leave a comment below to let us know what you think about this recipe as it will encourage our authors.

If you also want Super Saheliya to upload your recipes on our website then fill out the form by clicking on this link

https://docs.google.com/forms/d/e/1FAIpQLSdwwqGeXs_QiYuJ3yUHYMZN-QFgI8lDuIQrQ_xl2QMW2r2GiQ/viewform?usp=sf_link

Lawabdar Soya Chunks: Marathi Recipe

Lawabdar Soya Chunks prepared in delicious base gravy made by using fresh tomatoes, cashews, onions, peas, boiled potatoes finely mixed with Soya Chunks resulting in the mouth-watering recipe.

lawabdar soya chunks

chef Alka Jani

saheli Alka Jani

Lawabdar Soya Chunks is made by Alka Jani.Alka says that she has learned this recipe from her son’s friend who is Marathi so the whole recipe has Maharashtrian touch. She herself liked the recipe very much

INGRIDIENTS

1) 1 Bowl Soya Chunks Approx. 100-150 gms

2) 6 Nos. of Cashew

3) 5-6 Nos. of Black Pepper

4) 2 Nos. of Cloves

5) 1 Piece of Cinnamon

6)1 No. of Bay Leaf

7) 1 tbs of Sesame

8) 10-15 nos. of garlic cloves

9) 1 Inch of Ginger

10) 3 Onions

11) 3 Tomatoes

12) 1 Potato

13) 4 tbs Peas

14) 2 tbs Finely chopped coriander leaves

15) 1 tbsp Red Chilli Powder & 1 tbsp Kashmiri Chili Powder

16) 1.5 tbsp Coriander Powder

17) 1 tbs Garam Masala

18) Pinch of Hing

19) 6 tbs Oil

20) 1 tbs Ghee

21) 2 Glasses Boiled Water

22) Salt as per taste

23) 1 tbs Turmeric Powder

NUTRIENTS YOU GET

Soya Chunks are rich in Calcium, iron, fiber, and Protein without Providing no extra sugar or sodium to the body.

STEPS TO MAKE LAWABDAR SOYA CHUNKS

STEP 1

Soak 1 bowl of Soya Chunks in boiling water after adding salt for 15-20 mins and cover it with a lid. Finely Chop Tomatoes, Potato, and onion.

STEP 2

Put 2 tbs Oil in Kadai and saute cloves, cinnamon, black pepper, Bay leaf along with hing for 1-2 mins. Add Onion, Garlic Cloves, Cashew, Ginger in Kadai and add tomatoes after coloring of onion changes to light pink. Add Salt as per taste. Let it Cook till oil is released in Kadai.

STEP 3

Let this mixture cool down for some time, Grate this in mixer and make gravy of it. Dry down Soya Chunks and discard extra water by pressing them.

STEP 4

Boil Potato, peas in water after adding salt and drain water in a separate vessel and keep it. Take 4 tbs oil in Kadai, add hing, 1/2 tbs turmeric powder, and pour the gravy in it. Add Red Chili Powder, Kashmiri Chili Powder, Sesame, Garam Masala, Coriander Powder in it and let it cook for 2-3 mins.

STEP 5

Add Boiled Potatoes, peas & Soya Chunks in Gravy and Mix it thoroughly. Add 1.5-2 Glasses of Water ( Boiled Water used for potato & peas). Mix this and Let it cook for 10-15 mins after covering it with a lid. Add Chopped Coriander leaves after the oil gets released from the gravy

.

STEP 6

Serve Lawabdar Soya Chunks with Paratha, Chapati along with papad and Onion Salad.

Bajri Charmariya : Unique Winter Recipe

bajri charmariya

Bajri Charmariya is made by Sangita Vyas. Sangita says that she not only loves to cook food but she is interested in making variations to make the dish more healthy and presentable.This recipe she has learnt from Nipa Mistry from supersaheliya channel

sangita vyas

INGRIDIENTS

1 bowl black millet flour

1/2 bowl curd

2 tbsp chopped fenugreek leaves

2 tbsp chopped corriender leaves

1 small bowl grated paneer

1 no. Chopped onion

1 tbsp red chilli powder

Cumin powder 1tsp

1 tsp cumin seeds

sesame seeds 1tsp

sugar (optional) 1tsp

1 tbsp ginger garlic chilli paste

1 tsp Dry fenugreek leaves (kasuri methi)

Salt as per taste

Water if needed

A pinch of bicarbonate soda Oil for frying

NUTRIENTS YOU GET

It is very low in calories but is extremely rich in magnesium, fiber, bioactive compounds, and other important minerals and vitamins. Millets are a vital part of a well-balanced diet and moderate consumption of this whole grain is linked with effective weight loss.

STEPS TO MAKE BAJRI CHARMARIYA

STEP 1

Make all ingredients handy and add them in a big bowl.

STEP 2

Crumble and mix all ingredients by adding little by little curd and give it rest by at

STEP 3

Now, after resting on the batter, heat the oil, Add a Pinch of bicarbonate soda and two tablespoons of hot oil in the better. Mix the better well.

STEP 4

Start making small balls shape in the oil. Stir continuesly on medium to high flame.

TEP 5Now charmariya are ready.. Take out in the bowl and start preparing in the dish.

STEP 6

The dish is ready with chutney. Those charmariya are famous to eat in monsoon season. Or u can have them at any time, season or festival.. So tasty, sponge, yummy and healthy..😋 Can’t have it one.

STEP 7 This is the beauty of the creator, she always comes up with the short serving of the video which helps the reader to see the exact recipe in the creator’s house.

https://supersaheliya.com/wp-content/uploads/2021/11/VID20210807121035-Sangita-Vyas.mp4

Thank you so much for your time and do leave a comment below to let us know what you think about this recipe as it will encourage our authors.

If you also want Super Saheliya to upload your recipes on our website then fill out the form by clicking on this link

https://docs.google.com/forms/d/e/1FAIpQLSdwwqGeXs_QiYuJ3yUHYMZN-QFgI8lDuIQrQ_xl2QMW2r2GiQ/viewform?usp=sf_link

Enchiladas: A Mexican Dish

An enchilada is a corn tortilla rolled around a filling and covered with a savoury sauce. Originally from Mexican cuisine, enchiladas can be filled with various ingredients, including meats, cheese, beans, potatoes, vegetables, or combinations.

saheli sangita vyas

Sangita says that¨ for me, eating enchiladas is heaven.. I feel relaxed, that’s the nutrition fr me.¨

INGRIDIENTS

For tortillas.. maize flour .

wheat flour 1 bowl

maize flour 1 bowl

chilli flakes 1tsp

mix herbs 1 tsp

oregano 1 tsp

2 tsp olive oil

1 tsp salt

Water as required

For red sauce..

5 pcs red tomatoes

oil for greasing tomatoes 1 tsp

Kashmiri red chilli powder 1tsp

wheat flour 1tsp

2 tbsp olive oil

1 tsp each chilli flakes

oregano

mix herbs

Salt n water as required

For Fillings..

. 3 tbsp red boiled beans

3 tbsp chopped broccoli

2 tbsp chopped capsicums

2 tbsp chopped onion

1 tbsp green onion tube

2 tbsp spring onion

2 tbsp coriander

1 tbsp black pepper powder

Salt as per taste

2 tbsp red sauce

For Garnishing..

Cheese mozzarella as required

STEPS TO MAKE ENCHILADAS

STEP 1

Take an Equal part of flour add the masala as indicated, olive oil, and make a dough. Roll a chapati and roast it on Tava. cover it in a cloth.

STEP 2

Making red sauce..take tomatoes,grease it with oil, micro it fr the first 4 minutes then again 3 minutes.. tomatoes will be done. let it cool, then remove the skin and liquidise it by adding Kashmiri red chilli powder.

STEP 3

Heat olive oil,and add wheat flourand roast it until clear change of flour add sauce and all masala. let it boil for at least 3-4 minutes, cover it, when done, add some Spring onions and switch off the gas flame.

STEP 4

For filling. In a pan add oil, sauté broccoli followed by capsicum, onion, red beans white onion tube, spring onion, coriander and all dry masalas.

STEP 5

Now assembling the tortillas.. Take the tortilla apply sauce on it and put the filling and cheese and roll itand,follow the same procedure to all.

STEP 6

Assembling the roll in a baking tray.. Take a tray, apply some sauce on the tray, set the roll in it, pour all the sauce on the filled tortillas, cover completely, now add lots of mozzarella cheese on it, sprinkle some black pepper powder, herbs n oreganos. Now the Tray is ready to go into the oven. 10 minutes preheated on 160 c degrees.

STEP 7

It will take 7-8 minutes to be done, and in-between check the oven, if it’s done and Enchiladas are ready for eating now let them cool for a while. You can have it with drinks or all along…

Thank you so much for your time and do leave a comment below to let us know what you think about this recipe as it will encourage our authors.

If you also want Super Saheliya to upload your recipes on our website then fill out the form by clicking on this link

https://docs.google.com/forms/d/e/1FAIpQLSdwwqGeXs_QiYuJ3yUHYMZN-QFgI8lDuIQrQ_xl2QMW2r2GiQ/viewform?usp=sf_link

Patuda no lot : one pot meal

patuda lot

Patuda no lot recipe is made by falguni chauhan. Falguni says she learnt this recipe from Naimisha of YouTube channel supersaheliya. She feels thankful to the channel for helping her with all traditional recipes her family liked the most.

Saheli Falguni Chauhan

INGRIDIENTS TO MAKE PATUDA NO LOT

1 cup kanki korma no flour

1/2 tsp salt

half tsp chili paste

1/2 tsp ginger paste

1 cup yogurt

1 tsp whole cumin

Flour 1 tablespoon oil

Add 1 tbsp oil

For 1/2 cup coriander 

STEP 1

First, knead the flour in a bowl with oil

Turn on the gas and put oil in a pan

And add turmeric.

oil in the pan


STEP 2

Then add ginger chili paste in a saucepan and saute

And take as much yogurt as you can from the bowl.

After adding yogurt, add 2 cups of water.

Cover and let the flour rise for about 15 minutes.

Add chilly garlic to oil

STEP 3

Add salt and let it rise for 15 minutes

If we see after 15 minutes, Patunda’s flour is ready.

Add salt and boil

STEP 4

Now your patuda no lot is ready to eat. Garnish with coriander and serve with achar masala and oil

ready to eat !!

Thank you so much for your time and do leave a comment below to let us know what you think about this recipe as it will encourage our authors.

ખાટી ચોકલેટ ખાધા પછી મહિલાને લાગ્યો ૪૪૦ વોલ્ટ નો ઝટકો read this

If you also want Super Saheliya to upload your recipes on our website then fill out the form by clicking on this link

https://docs.google.com/forms/d/e/1FAIpQLSdwwqGeXs_QiYuJ3yUHYMZN-QFgI8lDuIQrQ_xl2QMW2r2GiQ/viewform?usp=sf_link

Exit mobile version